User's Guide
Project Files
You can upload files as part of your project. This is a useful capability for archiving and sharing important documents and resources related to your project. Files can also be a good way to archive data that does not otherwise fit into the structure of the site.
The Files Tab
The main place to interact with your project’s files is the “Files” tab, which appears on your project’s home page. (Note that the files tab will only appear if you have permission to upload files, or if the project has files that you are allowed to view).
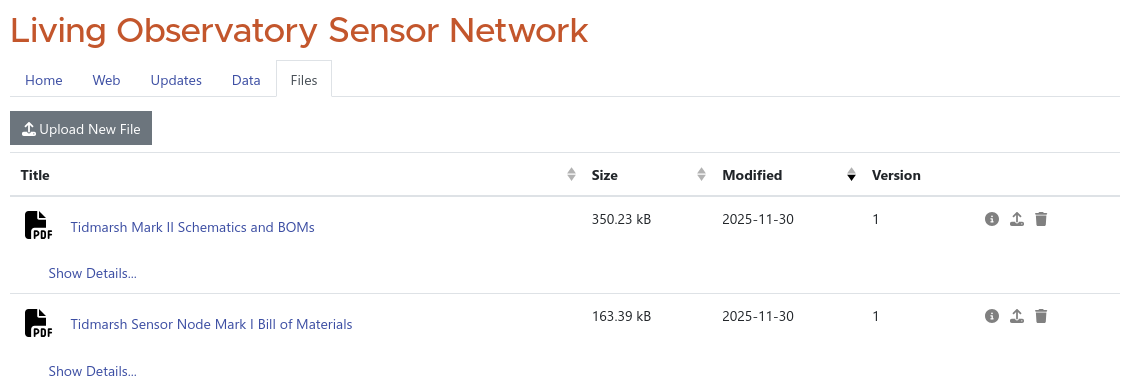
The Files tab lists all of the files associated with the project. By default, they are sorted in reverse chronological order (most recently updated files at the top) but you can change the sorting by clicking the headings at the top of the list. If a project has many files, they may be separated onto multiple pages that you can navigate by clicking the numbers at the bottom of the list.
Clicking on the title of a file will download the latest version.
Uploading a File
Note: While you can upload most files, there are a few types things that you should avoid:
- Photos and Images: You can upload these, but it is often better to use the photo-specific features of the platform.
- Video Files: Please upload these to a video hosting service like Vimeo or YouTube, which you can then embed in one of your project’s pages.
- Personal or Sensitive Information
- Very Large Files: If your file is larger than a few hundred megabytes, check with us before uploading.
To begin uploading a new file, click the “Upload New File” button at the top of the Files page, and select a file from your computer.
Once you have chosen a file, a dialog box prompting you for some metadata will appear:

The Title field is pre-filled with the original filename, but we reccommend that you enter a better title for the file. It does not have to follow file-naming rules, so you can use a nice human-readable title that describes what is in the file.
The Notes box lets you enter a longer description for the file. The description is displayed underneath the title on the files page, and can help visitors understand what is in the file before downloading.
The Status menu lets you select the visibility of the file. Public files are accessible to all visitors who can see your project (if your project has been published, this means everyone). If you designate a file as Private, only members of the project (people who are on the contributors list) will see the file and be able to download it. This can be useful for archiving materials that you aren’t ready to publish.
Viewing and Editing File Info
You can view details about a file, edit its metadata, and manage versions from the File Info dialog box, which is accessed by clicking on the "info" action button at the right side of a file’s entry in the list:

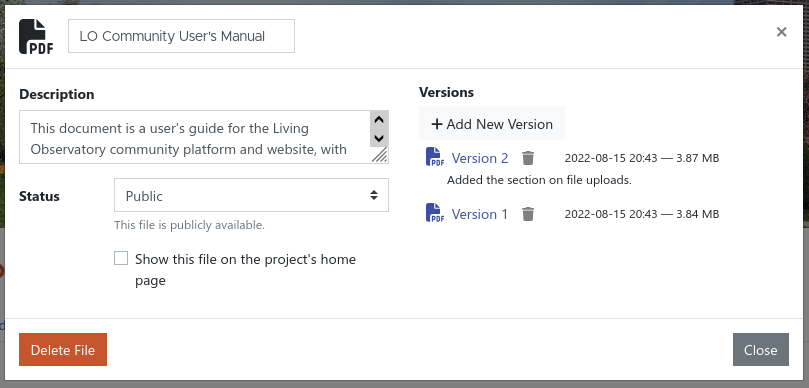
Within the info dialog box, you can edit the file’s title (at the top of the window), description, and public/private status. Make sure to remember to click the “Save” button, which will appear at the lower right of the dialog box when you have made changes.
If you check the box that says “Show this file on the project’s home page”, an icon for the file will be added to your project’s home page, underneath the list of contributors and institutions. This can be useful to help visitors discover key project files, such as a project research proposal or protocol.
The right side of the File Info dialog shows information about the file’s versions.
File Versions
If you have an updated version of a file, you should upload it as a new version. File versions let you keep the existing title, description, and status, and links pointing to the file elsewhere on the site will be automatically updated to download the latest version.
You can upload a new version in one of two ways:
- The “Add New Version” button above the version list in the file’s info dialog
- The “upload new version” action button at the right side of the file’s entry on the Files page
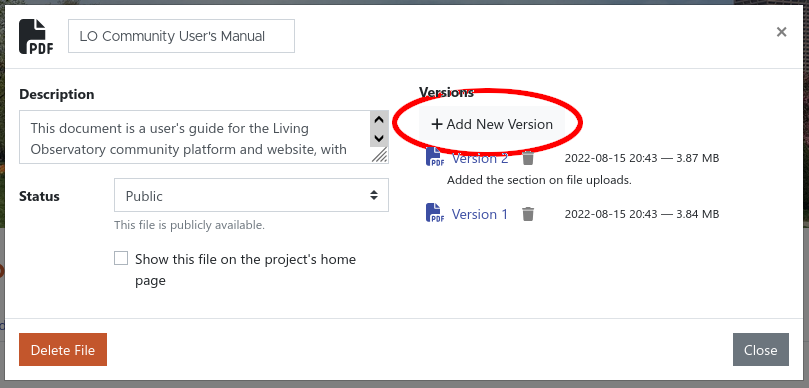

Clicking either button will prompt you to choose a file from your computer. On the next screen, you can enter any notes about the new version (such as a brief message explaining what has changed) which will be displayed below the entry in the version list in the file info dialog box. You can then click the "Upload" version to finish uploading the new version.
When a file has multiple versions, links pointing to the file will always download the most recent one. You can download older versions from the version list in the file’s Info dialog box by clicking on the version number you want.
If you need to delete an older version of a file (if, for example, you discover it contains information that should not have been published), you can remove a version permanently from the version list by clicking the trash can icon next to the version you want to delete.
Deleting Files
You can permanently remove the entry for a file by clicking the "Delete File" button in the file’s Info dialog box. This will remove all versions of the file.